
Sometimes you get an idea for a simple fix to make your life easier… and then that simple idea spirals out of control and becomes a massive project. I like to record my bike rides when I travel, but I don’t travel with a lot of storage media. I do have a NAS at home. The obvious solution would be to upload videos straight to my NAS, but I don’t want to expose my NAS to the Internet (I’m fully aware that there are secure ways to do this, but for the exercise’s sake, let’s ignore that).
My not-as-obvious but almost-as-simple solution was to upload the videos to AWS S3, have that upload generate an SQS message, and have my NAS run a scheduled task to poll the SQS for videos to download. I did this easily, and it works great! Being honest, I spent more time getting my Synology NAS to run AWS CLI commands than I did writing the actual script to poll and download – but that adventure could be its own post. Instead, here’s the jq tidbit I used to extract the bucket name and key from the SQS message for the download commands:
echo "$MESSAGES" | jq -c '.Messages[]?' | while read -r msg; do
  RECEIPT_HANDLE=$(echo "$msg" | jq -r '.ReceiptHandle')
  BODY=$(echo "$msg" | jq -r '.Body')
  KEY=$(echo "$BODY" | jq -r '.Records[0].s3.object.key')
BUCKET=$(echo "$BODY" | jq -r '.Records[0].s3.bucket.name')While I had solved my original issue, I hadn’t scratched the “build something cool” itch. Around the time I built this, I had also just finished the AWS Solutions Architect Associate certification. I don’t get many chances to use that knowledge in my workday, but I wanted to cement it – and the best way to do that is to build something real!
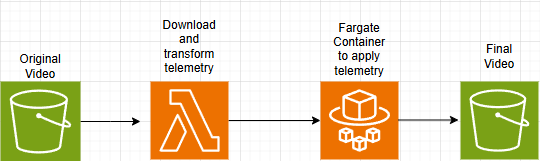
When I upload ride videos to YouTube, I don’t upload the raw footage. I download the GPS and health telemetry data and place it in an overlay, matching the timing of the video with my effort and route. What if, instead of manually editing the video when I get home, I just have AWS do the overlay for me? I started out by playing with the software I use at home, Telemetry Overlay, but was unable to automate anything unless I wanted to do clicking macros. Once that proved to be a dead end, I sketched out the rough order of steps I thought I’d need the infrastructure to accomplish:
- Accept an uploaded video
- Download the telemetry data from an API
- Extract the telemetry data and transform it into what needs to be in the video
- Burn telemetry into the uploaded video
- Upload finished video to a new bucket
Now I had some “easy” bite-sized chunks to work with, as well as a proposed architecture.
Extracting and Burning Telemetry
The first step was to extract the telemetry. Bike computers (and every fitness wearable for that matter) store data from activities in binary-encoded FIT files, and the fitparse Python library can do all of the heavy lifting for me. The code eventually got more complex for reasons we’ll get to later, but to extract the telemetry from the FIT files, it looked like this:
fitfile = FitFile("ride.fit")
records = []

for record in fitfile.get_messages("record"):
    fields = {f.name: f.value for f in record}
    if "timestamp" in fields:
        records.append(fields)

# Save data every 0.5 seconds
interval = timedelta(seconds=0.5)
last_time = None
frames = []

for r in records:
    if last_time is None or (r["timestamp"] - last_time) >= interval:
        frames.append(r)
last_time = r["timestamp"]Here we added all of the events in the FIT file to a list (records), then created a new list (frames) that only has updates from events half a second apart (a good video update cadence). Next up is putting the frames onto the video.
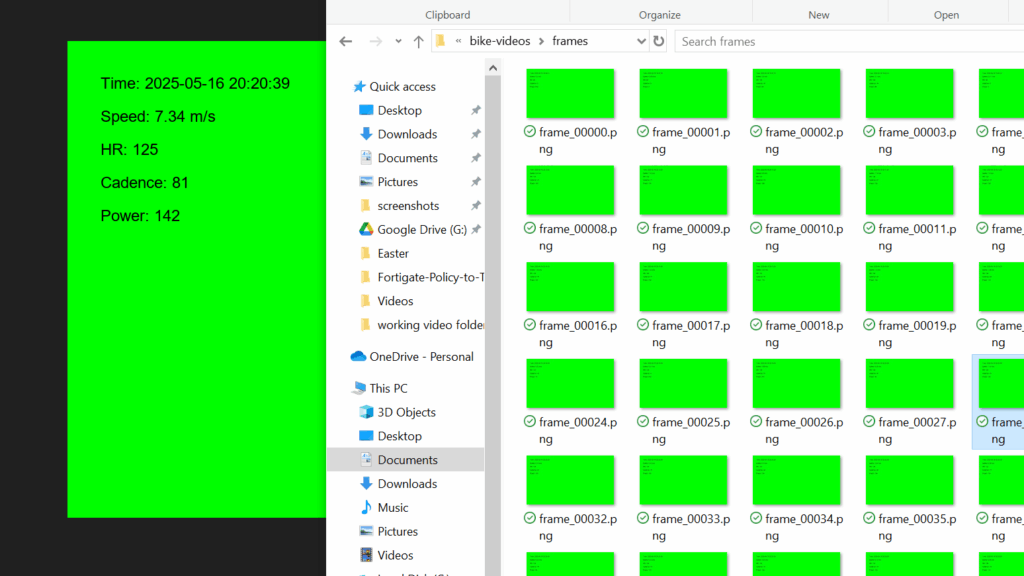
The only thing I knew at this point was that I’d be using FFmpeg to burn the frames in, but I wasn’t sure how. So I asked ChatGPT, which suggested using FFmpeg to burn chroma-keyed images onto the video. It was pretty simple to generate them using PIL, the Python Image Library:
for i, r in enumerate(frames):
    img = Image.new("RGB", (1280, 720), color=(0, 255, 0))  # Chroma green background
    draw = ImageDraw.Draw(img)
    draw.text((50, 50), f"Time: {r['timestamp']}", font=font, fill=(0, 0, 0))
    draw.text((50, 100), f"Speed: {r.get('speed', 'N/A')} m/s", font=font, fill=(0, 0, 0))
    draw.text((50, 150), f"HR: {r.get('heart_rate', 'N/A')}", font=font, fill=(0, 0, 0))
    draw.text((50, 200), f"Cadence: {r.get('cadence', 'N/A')}", font=font, fill=(0, 0, 0))
img.save(f"frames/frame_{i:05}.png")This works! Ugly, but decent for a proof of concept.
And then two lines of bash – one to generate a video from these frames, and a second to overlay them onto the original:
ffmpeg -framerate 2 -i frames/frame_%05d.png -c:v libx264 stats_overlay.mp4
ffmpeg -i main_video.mp4 -i stats_overlay.mp4 -filter_complex "[1:v]chromakey=0x00FF00:0.1:0.0[ckout];[0:v][ckout]overlay[out]" -map "[out]" -map 0:a? -c:a copy output.mp4This did work, but I was worried about keeping container size small between generating all those images and an extra video, since the end goal is to run this in the cloud. I remembered back to my days of taking torrented anime episodes and burning the subtitles in so I could watch them on my PSP, and realized it would be much more time and space-efficient to make a subtitle file and burn that in instead of making all these images and a video. ChatGPT put me on the right path, but my weebiness won this one.
I did play around with some libraries for automating the creation of Advanced SubStation Alpha files, but at the end of the day, it was easiest to iterate through the FIT file and just add a new line when appropriate:
for r in records:
t = r["deltaSeconds"]
#if it's been longer than the interval time make a new subs line
if t - lastOverlay >= subsInterval:
start = _formatASSTime(t)
end = _formatASSTime(t + subsInterval)
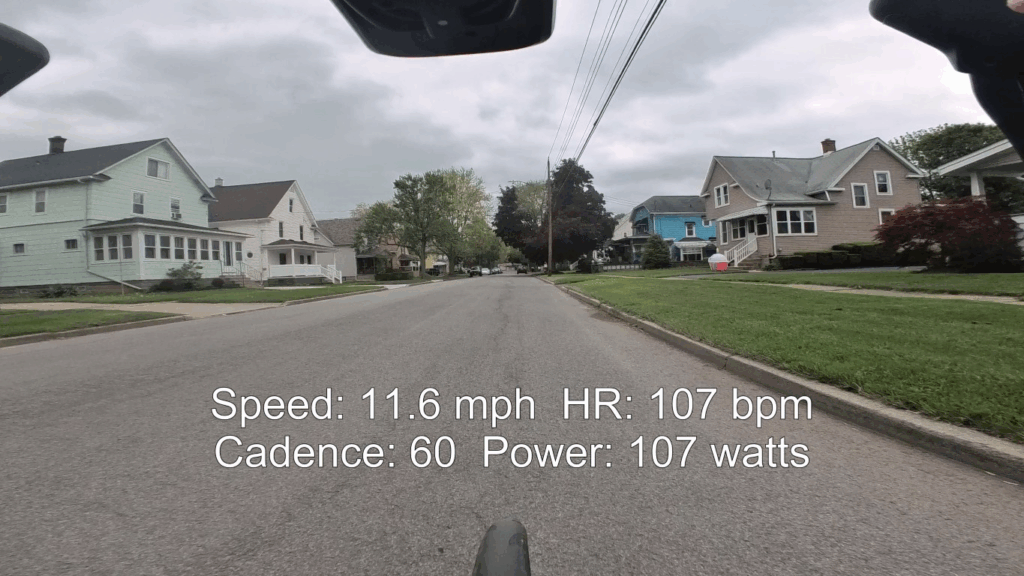
r['speed'] = r['speed'] * 2.23694 #convert m/s to mph
text = ( #generate stats for the line
f"Speed: {r.get('speed', 'N/A'):.1f} mph " #the :.1f truncates the number
f"HR: {r.get('heart_rate', 'N/A')} bpm "
f"Cadence: {r.get('cadence', 'N/A')} "
f"Power: {r.get('power', 'N/A')} watts"
)
#write this intervals stats to subs
dialogue = f"Dialogue: 0,{start},{end},Default,,0,0,0,,{text}\n"
lines.append(dialogue)
lastOverlay = tWrite the header of the subtitles file along with lines[] and we’re golden! My local proof of concept was now complete.
…except I forgot that the FIT file doesn’t start when I start the camera – it starts when I start the ride!
Metadata Metaproblems
The solution to the timing problem is pretty simple when we’re running this locally: use the metadata from the original video to figure out which records we need from the FIT file. There’s a great library named MediaInfo that allows you to extract metadata from most media files, and a Python wrapper for it. Getting this to run locally was a cinch:
#method to get video metadata in datetime objects
def getVideoInfo(filename):
    from pymediainfo import MediaInfo

    videoinfo = MediaInfo.parse(filename)
    for track in videoinfo.tracks:
        if track.track_type == "General":
            date, startTime = _parseTimefromVideo(track.encoded_date)
            duration = timedelta(milliseconds=track.duration)
            endTime = startTime + duration
            videoMetadata = {
                "date":date.isoformat(),
                "startTime":startTime.isoformat(),
                "duration":track.duration,
                "endTime":endTime.isoformat(),
                "startEpoch":startTime.timestamp(),
                "endEpoch":endTime.timestamp()
            }
return videoMetadataBut once again, this being a cloud project, I really needed to limit data transfers. In my head, the generation of the subtitles file would be done by a Lambda function; I certainly don’t want to send 9-12GB files over to Lambda just to read some metadata! So I learned a bit about MP4 files and where MediaInfo was grabbing this metadata from.
I’ll try to summarize from here, but suffice it to say it was a days-long process. It turns out there are a lot of ways to put metadata in an MP4, depending on how you encode it. The big piece I needed was duration, which would tell the subs file when to end. I tried reading the file header, then the first 128kb of the file, then the last 512kb, then concatenating the first and last parts, and kept striking out. Eventually, I learned that MediaInfo wasn’t getting duration from any special moov atom or mvhd flag – it was just counting the frames and adding them up. I eventually gave up on efficiently finding the metadata in the cloud. Instead, I wrote an uploader that sends the metadata in a JSON file along with the video.
Now, two months divorced from the problem, I realize that all I ever needed was a start time, and therefore this metadata issue was never a real problem. Who cares if the sub file has extra data after the end of the video? It’s a few extra kilobytes at worst! Oh well, live and learn.
Downloading Telemetry from an API
So far, I’d been working with the same few test videos and test FIT files, but obviously, I need to grab these FIT files on the fly. If you’re familiar with endurance sports, then you’re probably familiar with Strava as well. Strava is a website that tracks fitness data, wrapping a social media site around it – and if you’re a tech-savvy endurance nerd, it’s probably your single source of truth for tracking fitness data. It integrates with all major wearables and has a fairly friendly API to work with if your device doesn’t integrate with it out of the box.
I went into this project with the assumption that Strava accepts the FIT file from a device and creates activities from that, keeping the original FIT file accessible. I ran into a lot of issues requesting the FIT file from the API before I realized I had two issues: 1. Strava only saves a FIT file for an activity if the device sends a FIT file; many devices (like my Hammerhead Karoo) integrate in a different manner so there’s no FIT file at all, and 2. GDPR had Strava change their API availability last November.
Giving up on pulling from Strava, I pivoted to my Hammerhead Karoo dashboard, but it lacked an API endpoint for activities. Trying to manually authenticate and download a file programmatically did not seem worth it when there were so many other options. The option I eventually landed on was intervals.icu, a much more data and statitistics-intensive site. I’d already been using intervals for years to track training metrics like my fitness via TSS, so all I had to do was reconfigure my Karoo to upload the FIT file directly to intervals instead of having Strava push the data to intervals.
Building the script to request the FIT file was super simple, too. intervals has an OAuth integration available if you need to work with several different accounts, but if you’re solo you can generate a token for your account and pass it as a header to /api/v1/activity/{activity-id}/fit-file and it will automatically use your own account. Finding the correct activity ID wasn’t too bad either:
def findActivity(targetDate, headers):
    response = requests.get(
        f'{URL}/athlete/0/activities',
        headers=headers,
        params={'oldest': targetDate, 'newest': targetDate},
        timeout=20
    )

    response.raise_for_status()
    activities = response.json()

    for activity in activities:
        if activity['type'] == "Ride":
            return activity['id'], activity['name']

    print (f"No matched activity for {targetDate}")
return None, NoneUsing the metadata upload as a trigger, I built a Lambda function to query a list of all of my activities, download the FIT file that matches based on activity date, use the FIT file and metadata to generate the subtitles file, then upload the subtitles file to S3. Finally, the subtitle file upload will trigger the rendering of the final video!
The Container
With the subtitle file generation working properly, the next step was to build the video-rendering container to be run by ECS Fargate. The container needed to do three things:
- Download the raw video and subtitles file from S3
- Render the final video
- Save the video to S3
The container’s only dependencies were Python, AWSCLI, and FFmpeg, so the Dockerfile was super simple. The script the container runs wasn’t much more complicated either:
#!/bin/bash

#environment variables passed to container at runtime
echo "source bucket = {$BUCKET}"
echo "sub file = {$SUBS_KEY}"
echo "output bucket = {$OUTBUCKET}"

#derive filenames, input files have the same name but different extensions - we're working off the .ass file
SUBS_FILENAME=$(basename "$SUBS_KEY")
BASE_NAME="${SUBS_FILENAME%.*}"
VIDEO_KEY="${BASE_NAME}.mp4"
OUTPUT_KEY="${BASE_NAME}_burned.mp4"

#local file names for processing
INPUT_VIDEO="input.mp4"
SUBS_FILE="subs.ass"
OUTPUT_VIDEO="output.mp4"

#download from s3
aws s3 cp "s3://${BUCKET}/${VIDEO_KEY}" "$INPUT_VIDEO"
aws s3 cp "s3://${BUCKET}/${SUBS_KEY}" "$SUBS_FILE"

#burn subtitles
echo "$INPUT_VIDEO + $SUBS_FILE = $OUTPUT_VIDEO"
ffmpeg -y -i "$INPUT_VIDEO" -vf "subtitles=${SUBS_FILE}" -c:a copy "$OUTPUT_VIDEO"

#upload result
aws s3 cp "$OUTPUT_VIDEO" "s3://${OUTBUCKET}/${OUTPUT_KEY}"

echo "Output uploaded to s3://${OUTBUCKET}/${OUTPUT_KEY}"Balancing the amount of resources the container needed to render the video vs the amount of compute time was the really challenging part. Most of my videos are in the 20-30 minute range. With the limited CPU types available in Fargate, the best speed I could bring it to render at (inside budget) was .7x. If I were ever to try to scale this up or open it to the public, I’d re-architect it to use EC2 instead of Fargate to leverage GPUs.
Tying it All Together
At this point in the project, I had working code to handle the telemetry data and working code to burn the video. However, all of the testing was still manual; to automate the whole process, I’d need to build some Step Functions and EventBridge notifications. And if I was going to go that far, why not do it all in Terraform? That way, I’d have it as a portfolio project as well! I’m afraid the Terraform part of this project doesn’t make for good reading since all of the clever bits were in the telemetry and rendering portion. Let’s just say it was 20% writing the Terraform, 75% asking ChatGPT for help formatting the different IAM policies, and 5% vetting those policies to ensure they properly secured everything. Some say I’m still stuck in the spiderweb of using JSON to make policy documents, role policies, roles, assume roles, and task execution roles.
Anyway, here’s the final workflow diagram. The full Terraform is available in the repository if it so tickles you.
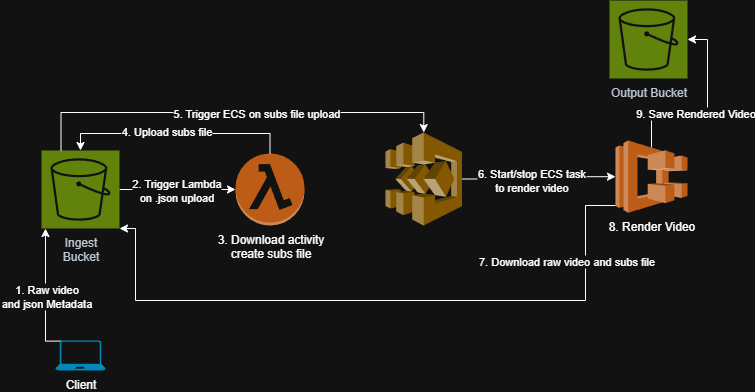
And the final workflow in text form:
- Users run a local interactive script
uploadtoS3.pythat extracts metadata from the video, then uploads both the video and ajsonfile with required metadata for the next step. - A lambda function
.\lambdaFunctions\lambda_function.pytriggers that- Downloads the
jsonfile to temp storage. - Examines the
jsonto get the date of the activity. - Finds the matching activity on
intervals.icu– the API key is stored securely in AWS Parameter Store. - Downloads the
.fitfile via API. - Generates a
.asssubtitle file with the heart rate, power, cadence, and speed telemetries timed to the activities in the FIT file. - Uploads the subtitle file to s3.
- Downloads the
- An EventBridge rule triggered by
.assupload starts a container./container/burn_subs.shvia Step Functions to render the subtitles onto the original video.- The container downloads the original
.mp4and the.asstelemetry subtitles to temp storage. - It burns the telemetry into a new
.mp4video. - After rendering finishes it uploads the new
.mp4to the output bucket.
- The container downloads the original
Repository: https://github.com/pmalley130/bike-videos-with-overlay